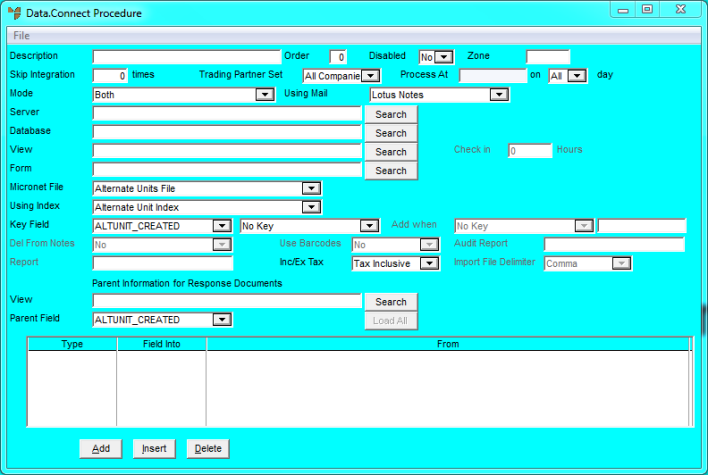
To create a Data.Connect routine for Micronet Paperless Sync:
Micronet displays the Data.Connect Procedure screen.
|
|
Field |
Value |
|
|
Description |
Enter a description for the Data.Connect routine you are creating, e.g. Paperless Sync. |
|
|
Disabled |
Select No. |
|
|
Mode |
Select MSA PDA Master List Updates. |
|
|
Form |
When you select a Micronet File, Micronet sets this to the default name for the exported data file. |
|
|
Micronet File |
Select the file you want to export. Valid options are:
When you select a file, Micronet displays a message asking if you want to load fields for the selected file. Select Yes to display those fields at the bottom of the Data.Connect Procedure screen. You can then add, insert or delete fields as described in the procedure below. |
|
|
Using Index |
Micronet sets this according to the Micronet File selected. |
|
|
Key Field |
Micronet sets this according to the Micronet File selected. |
|
|
View |
See the Parent field below. |
|
|
Parent Field |
Use this field with the View field to limit the data exported. For example, if you selected Debtors Master File in the Micronet File field and you want to limit the debtors exported, set this field to the value you want to limit the export to and set the View field to the value you want to use. For example, the following settings would only export debtor records where the DBT_SALESMAN = 3.
You can also use a comma (or) statement. For example, these settings would extract all debtors with a salesman equal to 1 or 5.
Alternatively, if you selected Company Control File in the Micronet File field, you only want to export one set of company information to PDAs. Thus you would set the View field as the company ID and the Parent Field field as COMP_NO. Your routine would then search for that company to export.
|
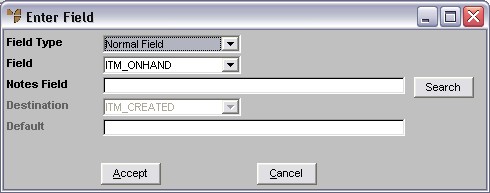
You can change the fields exported if required. The following steps explain how to change the Stock on Hand figures if you selected Inventory Master File as the Micronet File. Part of this file is the SOH taken from ITM_ONHAND.
Micronet displays the Enter Field screen.
|
|
Field |
Value |
|
|
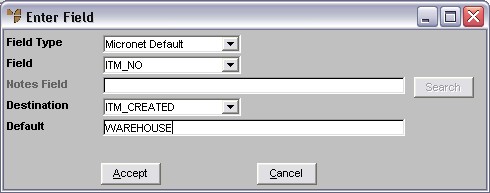
Field Type |
Select Micronet Default. |
|
|
Field |
Select ITM_NO. |
|
|
Default |
Enter "Warehouse". |
Your screen should now look like this:
Micronet redisplays the Data.Connect Procedure screen showing the fields you selected.
|
|
|
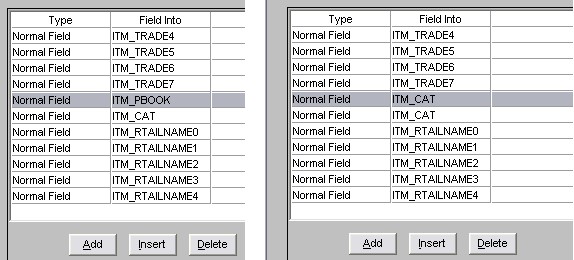
Technical Tip When using the PDA, you have three main indexes you can use - Item Number, Item Description and the Price Book. If you don't use the Micronet price book, change the ITM_PBOOK field to ITM_CAT and you can then use the category price as an index on the PDA.
|